

A practical and stylish wet room doesn’t have to feel cold, cramped, or difficult to maintain. You can create a stylish, durable space by planning the layout, waterproofing, drainage falls, and ventilation before choosing finishes. A level-access shower, slip-resistant flooring, concealed pipework, built-in storage, and layered lighting will improve both safety and appearance. Careful tile and fixture selection also reduces cleaning demands, but the smallest planning error can affect the entire installation.
Key Takeaways
- Plan the layout around efficient drainage, clear entry routes, adequate turning space, and fixtures positioned outside the main splash zone.
- Create a spacious walk-in shower with fixed glass screens, recessed niches, accessible controls, and a linear drain.
- Install a certified waterproofing membrane, carefully sealed joints, and consistent floor falls of approximately 1:50 toward the drain.
- Choose slip-resistant, easy-clean tiles, sealed grout, corrosion-resistant fixtures, and built-in storage with slightly sloped shelves.
- Combine IP-rated layered lighting, warm dimmable LEDs, concealed pipework, and low-maintenance glass features for stylish practicality.
Plan a Wet Room Layout That Flows
Start by mapping the wet room around its drainage, shower, and entry points. Position the shower where pipe runs stay short, then place the drain at the lowest practical point to support efficient flow.
Keep the entry clear of direct spray, and allow enough turning space for comfortable movement. Use a fixed glass screen to contain water without interrupting sightlines.
Set the basin and toilet outside the main splash zone, maintaining manufacturer-required clearances for access and servicing.
Plan door swings carefully, or choose a sliding or outward-opening door to preserve usable floor area.
Coordinate lighting, storage, and color schemes with the room’s proportions so the space feels balanced.
Finally, select suitable ventilation options, locating extraction near the shower and providing make-up air beneath the door.
Get the Waterproofing Right
Choose a quality waterproof membrane rated for wet-room use and install it over a clean, stable substrate.
You’ll need to seal every joint, corner, penetration, and drain connection with the manufacturer’s approved tapes, collars, or sealant.
Follow the system’s installation instructions precisely to prevent hidden moisture damage.
Choose Quality Waterproof Membranes
A reliable wet room depends on a continuous waterproofing system beneath the tiles, not on the tiles or grout alone. Choose a certified waterproof membrane designed for wet-room installations, and confirm its compatibility with your substrate, adhesive, drainage system, and tile finish.
Sheet membranes provide consistent thickness and fast coverage, while liquid-applied products suit irregular surfaces when you apply them at the specified coverage rate. Follow the manufacturer’s requirements for priming, curing, thickness, and water testing; shortcuts can leave hidden paths for moisture.
Extend the membrane across the entire shower area and floor, rather than treating only visibly exposed sections. Remember that tile sealing improves stain resistance but doesn’t replace waterproofing.
Select products with documented performance, installation guidance, and warranties, then photograph the completed system before tiling.
Seal Every Joint Properly
Where waterproofing sheets meet, seal every joint with the manufacturer’s approved tape, band, or sealant to maintain a continuous barrier. Before applying it, verify each surface is clean, dry, dust-free, and firmly bonded.
Press tape into corners and seams without wrinkles, then embed it fully in the compatible adhesive or membrane. Use preformed internal and external corner pieces where available; don’t stretch them, because tension can create gaps.
Seal around pipes, drains, niches, and changes in material with the system’s specified collars or flexible sealant. Follow curing times and overlap requirements precisely.
Effective joint sealing depends on using products from one tested system, not mixing incompatible brands. These waterproofing techniques prevent hidden leaks, so inspect every connection before covering the membrane with adhesive, tile, or screed. Repair damage immediately.
Plan Drainage and Floor Falls Correctly
Plan the drainage layout before fixing the floor levels, so water flows reliably toward the waste without creating trip hazards or ponding.
Begin with accurate Drainage planning: locate the waste, confirm pipe routes, and check the finished connection height.
Set the floor gradient consistently toward the outlet, typically around 1:50, while following your building regulations and manufacturer’s instructions.
Use a level and straightedge to verify falls across the entire wet area, including transitions around the waste.
Keep the drain accessible for maintenance, and avoid sharp changes that could interrupt water movement.
Coordinate the screed depth with the waterproofing system, ensuring the substrate remains stable and fully supported.
Test the fall with water before tiling, then correct low spots immediately.
Don’t rely on tile adhesive to compensate for poor levels.
Create a Spacious Walk-In Shower
Create a spacious walk-in shower by maximising clear floor area and keeping the entry unobstructed. Specify a fixed glass screen rather than a hinged door, and position it to contain spray without narrowing circulation.
Align the showerhead with the screen’s protected side, while placing controls near the entrance so you won’t step into hot water.
Use a linear drain along the rear or wall edge to simplify the layout and support efficient drainage.
Keep wall niches recessed to prevent fittings from projecting into the shower zone.
Plan bathroom ventilation with an extractor sized for the room, positioned to remove humid air effectively.
If you need screening, consider privacy solutions such as fluted, frosted, or lightly tinted glass.
Confirm clearances around the shower, basin, and toilet before fixing partitions permanently.
Choose Safe, Slip-Resistant Flooring

Choose textured tile to improve traction under wet conditions without compromising your wet room’s style.
Check each product’s slip rating and select flooring tested for wet-area use.
You’ll create a safer surface by matching the tile’s rating to the room’s water exposure.
Choose Textured Tile
Textured tile gives your wet room the traction needed to reduce slips on constantly wet surfaces. Choose textured tiles with a consistent, comfortable profile that supports bare feet without creating sharp edges or difficult cleaning zones.
Small-format tiles can increase grout lines, improving underfoot contact while helping installers form accurate falls toward the drain. Use tactile surfaces in shower areas, around the basin, and near the entry, where water commonly collects.
Confirm that the tile suits wet-room installation and that its surface remains practical to clean; deep grooves can trap soap, hair, and mineral deposits. Select a finish that balances grip with visual simplicity, then coordinate its color and pattern with wall tiles.
Install the surface level, maintain even joints, and seal compatible grout according to the manufacturer’s instructions.
Consider Slip Ratings
Before selecting flooring, check its slip rating for wet barefoot conditions rather than relying on texture alone. Review the manufacturer’s test data and choose a product rated for continuously wet areas, such as a wet room or shower floor.
Confirm whether the rating applies to barefoot use, because footwear classifications may not reflect actual bathroom performance. Prioritize tiles with suitable pendulum or barefoot ramp-test results, and verify the required standard with your installer or local building authority.
Smaller tiles can improve drainage and provide more grout joints, but grout isn’t a substitute for certified slip safety. Avoid highly polished stone and untested sealers, which can reduce traction when wet.
Create non slip surfaces with compatible adhesives, accurate falls, and regular cleaning that removes soap residue without leaving a slippery film.
Add Smart Storage Without Clutter
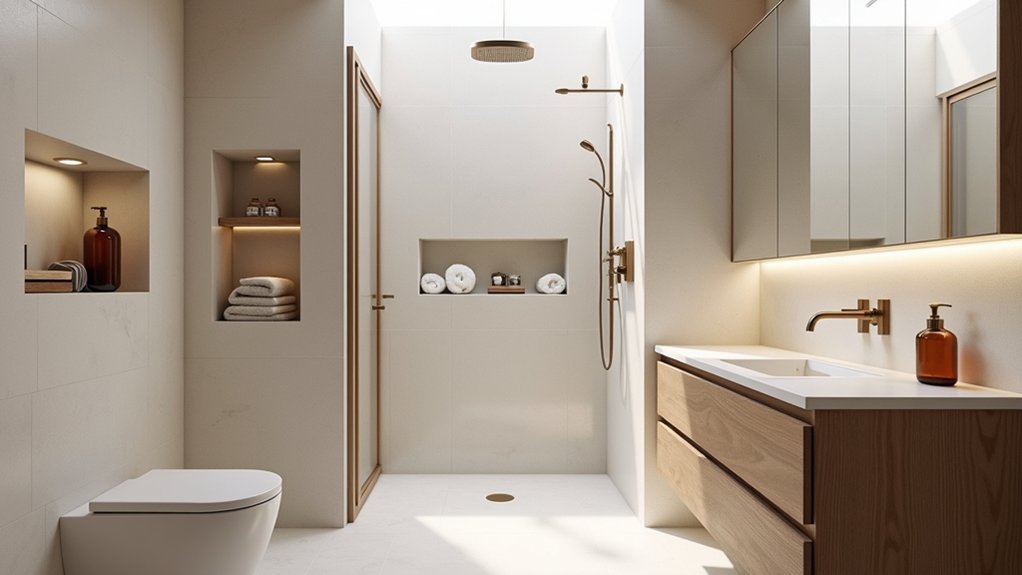
In a wet room, built-in storage keeps toiletries accessible without disrupting the clean, open layout. Specify recessed niches between wall studs, then waterproof their interiors with a tanking system compatible with your wall finish. Add a slight shelf fall toward the room to prevent standing water, and seal every joint with sanitary silicone.
Use hidden compartments behind mirrored panels or beneath a wall-hung vanity to store cleaning products and spare towels. Choose multifunctional shelving that combines a towel rail, hooks, and bottle ledges in one compact unit.
Keep shelves shallow, so they don’t obstruct movement or reduce usable floor area. Select corrosion-resistant stainless steel, anodized aluminum, or sealed solid-surface materials.
Plan storage locations before plumbing installation, checking stud positions, pipe routes, access clearances, and door swings to avoid costly alterations later.
Use Lighting to Set the Mood
How can lighting make a wet room feel both functional and relaxing? Start with layered illumination. Install recessed, IP-rated ceiling fittings for even ambient lighting. Then add focused task lights near the mirror and basin. Choose fixtures rated for the room’s moisture zones, and position switches outside splash areas or use suitable waterproof controls.
Use dimmable LEDs so you can increase brightness for grooming and reduce it for a calmer evening atmosphere. Select a color temperature around 3000K for warmth without distorting skin tones. You can also use concealed strip lighting beneath a vanity or within shelving to create gentle, indirect highlights.
Coordinate your color schemes with the light output: warm lamps complement earthy finishes, while neutral or cool lamps sharpen minimalist palettes. Keep glare controlled with diffusers and avoid exposed bulbs in direct sightlines.
Choose Easy-Clean Tiles and Fixtures
Once the lighting plan is set, choose surfaces and fittings that won’t demand constant upkeep. Select large-format porcelain tiles to reduce joints, and choose a textured, slip-resistant finish rated for wet areas. Avoid deeply ridged patterns, which trap soap residue and make cleaning slower. Specify epoxy or sealed Easy clean grout to limit staining, mould, and water absorption. Keep tile edges accurately aligned so water flows toward the drain without pooling.
For walls, use non-porous porcelain or sintered stone rather than materials requiring frequent sealing. Install minimalist fixtures with smooth profiles, concealed pipework, and wall-mounted controls where practical. Choose brushed stainless steel or high-quality chrome, checking that each finish resists corrosion.
Fit a frameless glass screen with protective coating, and provide accessible joints so you can inspect and clean them regularly.
Set a Realistic Wet Room Budget
Set your wet room budget by separating essential waterproofing and drainage work from optional finishes and upgrades. Prioritise a compliant tanking system, correctly sloped floor, linear drain, plumbing, ventilation, and professional installation. These components protect your property and shouldn’t be reduced to meet a target figure.
For effective Budget planning, measure the room accurately and list every required material, fixture, labour charge, delivery fee, and disposal cost. Use cost estimation from at least three qualified contractors, then compare specifications rather than headline prices. Include a contingency of 10–20% for concealed damage, substrate repairs, or unexpected pipework changes.
Allocate remaining funds to tiles, screens, brassware, lighting, and storage. Choose durable finishes first, and postpone decorative upgrades if necessary. Confirm warranty coverage, payment stages, and building-control requirements before signing a contract. Recheck your budget after selecting each product.
Frequently Asked Questions
Is Planning Permission Required to Install a Wet Room?
You usually won’t need planning permission to install a wet room, but you must follow Building codes and waterproofing standards. Check local rules, especially for structural changes, listed buildings, drainage alterations, or flats.
Can a Wet Room Be Installed in a Small Bathroom?
Yes, you can install a wet room in a small bathroom. Optimise your Bathroom layout with a level floor, discreet drainage, compact fixtures, and waterproof membranes; careful Space optimization keeps the room practical and accessible.
How Long Does a Typical Wet Room Installation Take?
You’ll typically need 7–14 days for installation, including preparation, plumbing, waterproofing techniques, curing, and tiling. Tile choices, bathroom size, structural repairs, drying times, and contractor availability can extend your project schedule.
Can Underfloor Heating Be Installed Beneath Wet Room Flooring?
Yes, you can install underfloor heating beneath wet-room flooring. About 10% of household energy use supports water heating, so choose compatible Flooring options and Heating systems, waterproof membranes, insulation, and qualified electrical installation.
What Ventilation Is Recommended to Prevent Mould and Condensation?
Install mechanical extraction with humidity sensors and adequate airflow; Ventilation systems should run during and after showers. Use continuous Moisture control, duct externally, avoid recirculation, and maintain clear air inlets to prevent condensation and mould.
Conclusion
A well-designed wet room is like a carefully engineered ship: every element must work together. Plan the layout as your route, waterproofing as the hull, and drainage as the bilge that carries water safely away. Let slip-resistant flooring provide firm footing, while storage, lighting, tiles, and fixtures keep the cabin orderly and inviting. If you balance performance, maintenance, style, and budget from the outset, you’ll create a durable space that navigates daily use with confidence.